Embed CO Records in Email Table Cloud Content App Documentation
Table of Contents
The Embed CO Records in Email Table Cloud Content App enables you to embed multiple rows of data from Eloqua Custom Objects (COs) into an email using HTML. In this document, we’ll explain the whole process in detail.
Advanced Formatting with HTML
The Content App allows Eloqua users to insert content into an email, and insert text or HTML before and after the CO records. A working knowledge of HTML coding is essential for creating well-formatted emails. Use our step-by-step guide to keep your work on the right track.
Installation and Configuration
Please follow these instructions to set up this cloud app in your Oracle Eloqua instance.
- Log in to Oracle Eloqua.
- Click on Get App below to install.
NOTE: If prompted to log again, please do so.
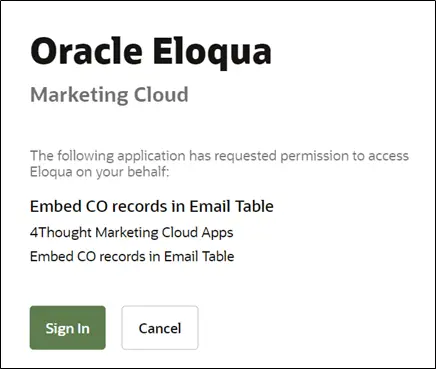
- In the next screen, click “Sign In” and then “Accept”
- On the next screen, click “Sign In” and then “Accept”.
- You’re all set! The cloud action is ready for use.

Preparing your Custom Object for Use
- Before using this cloud app, you must first add a new field to the CO that indicates the record was used. For example, you could add a “Status Text” field and insert the value “Completed” after processing. The app can also insert a date stamp.
![]()
Using the Cloud Content App
To configure the Cloud Content App in your email:
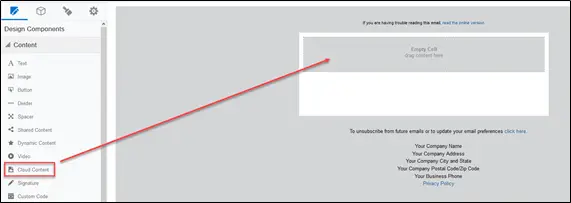
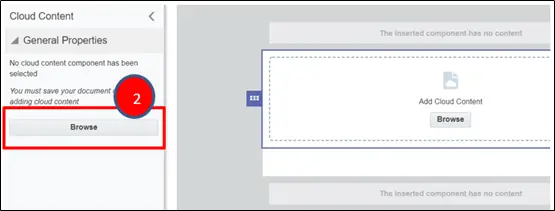
- Drag a Cloud Content component onto your email as shown here.
- Click on the “Browse” button for the cloud content component and then the “Browse” button under the Cloud Content option in the left menu. This will display a list of all Cloud Content elements in your Eloqua instance.
- Search for “Embed CO Records in Email Table”. From the list, choose “Embed CO Records in Email table Cloud Content”.
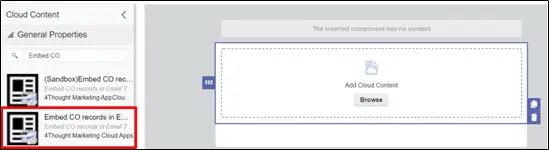
- When the 4Thought Marketing Cloud Content displays on the email, click on the “Configure” button in the left menu.
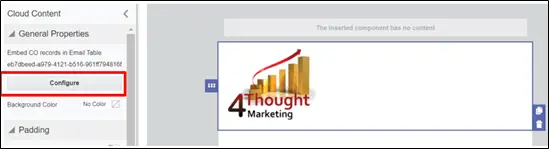
- Click on the “Configure” button, and a popup will appear to configure the app. Choose the CO table that contains the data for your table.
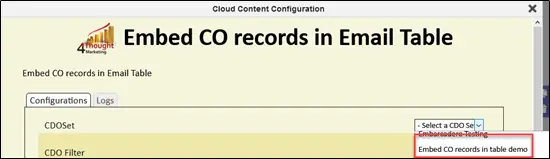
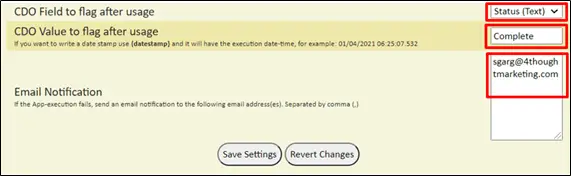
- Next, select the CDO field to flag after usage, and specify the value to insert. You may also insert a date by using {datestamp}.
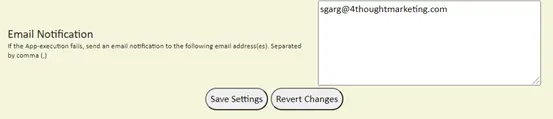
- And finally, specify an email address to receive a notification if there is an error. Click on “Save Settings”.
Creating Filters
- The next step is to create a filter. A list of available fields and field identifiers, used to create the necessary filter, is displayed from the CO you selected. In the example below, we’ll show you how to include records where the Product ID is equal to 687. In the CDO filter field, enter ‘{2}’ =’687′. Please note that you will need to reference the field “number” in the filter definition.
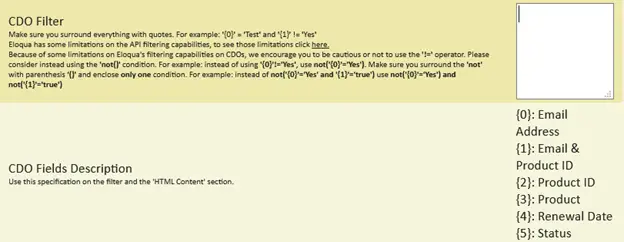
- All CO fields will have a number in the same series they have already added. For example, if the first field in your CO is the email address, the second field is email and product ID, the third field is product ID, the fourth field is product, the fifth field renewal date, the sixth field is status, then the field number will be auto-generated and visible on CDO fields Description area like {0}{1}{2}{3}{4}{5}.
Filter Operators
Not
Because Eloqua does not support using “!=” for “Does Not Equal”, use the not() operator in your filter. For example, if you wish to return records where Product ID is not equal to “687”, your filter would contain not(‘{2}’)=’687’
Today
The following are examples of some of the variables you can use to filter data. Note that the value “39” corresponds to your ‘Renew – ExpirationDate’ filtering field.
Syntax: today({fieldId}[,+-,Number(Days/Weeks/Months])
Examples
- today({39},+,5d) => Records where the date field {39} value is 5 days after today
- today({39},-,5w) => Records where the date field {39} value is 5 weeks before today
- not(today({39},+,5m)) => Records where the date field {39} value is Not 5 months after today
Range
Syntax: range( {fieldId}[,+-,Number(Days/Weeks/Months])
- range({39},+,5d) => Records where the date field {39} value is within the next 5 days (including today)
- range({39},-,5w) => Records where the date field {39} value is within the last 5 weeks (including today)
- not(range({39},-,5m)) => Records where the date field {39} value is NOT within the last 5 months (including today)
Configuring Tables and Field Merges
- The last step in the configuration is to add the HTML code that will build the table of records. There is a box for the code to write before the records are added; the code for the table itself; and the code to write after the table

Your email Cloud Content App configuration is complete! Complete the remainder of your email, and give it a test run.
- Make sure you click “Save Settings” to save your configuration. If you make any changes, you can click “Revert Changes” to go back to the last saved configuration
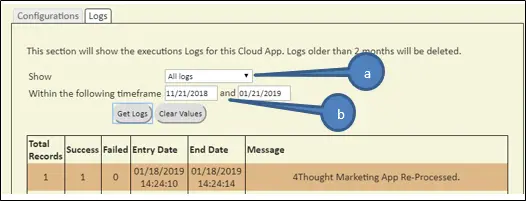
Logs
This section shows the execution logs for the cloud app
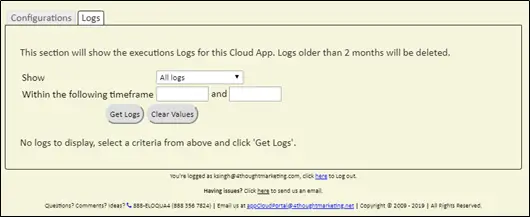
a. Show: Here, you can select what type of log you want to see. You have an option to select “All logs”, “Successful logs only”, “Failed logs only”.
b. Within the following timeframe: This field allows you to select the timeframe to view the execution logs.
Note: You can view up to 2 months of logs.