Campaign Membership Cloud App Documentation
Table of Contents
Purpose of the Campaign Membership Cloud Action
This app creates external activity records and campaign responses from a list upload. With the app, you can have a list with multiple contacts and multiple campaigns (one per contact), and it will create campaign responses for the campaign specified on each row.
This document will show how this Cloud Action can be used inside Custom Object (CO) Program Canvas.
Set-up in Oracle Eloqua
Please follow these instructions to set up this cloud app in your Oracle Eloqua instance.
- Log in to Oracle Eloqua.
- Click on Get App below to install.
NOTE: If prompted to log again, please do so.
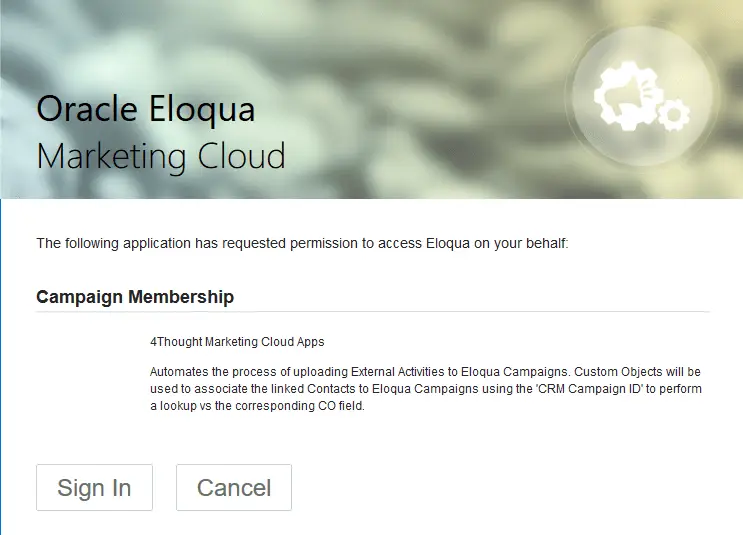
- In the next screen, click “Sign In” and then “Accept”
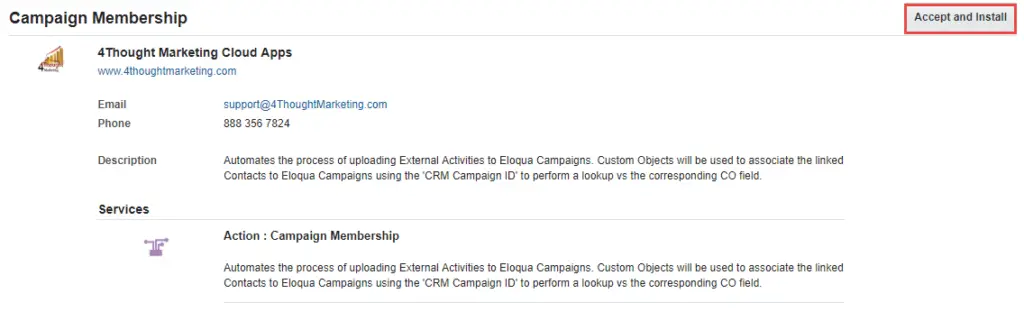
- In the following screen, click “Accept and Install”
- In the following screen, click “Accept and Install”

How to use
The following instructions show a basic/simple usage. You can incorporate this Cloud Action to any existing CO based Program Canvas.
- Create/Open a CO Program Canvas
- Select the CO which you want to use in this process
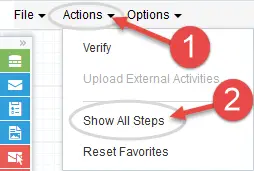
- Click on “Actions” on the top left side then “Show All Steps” and then locate the “Campaign Membership” Cloud Action under the Actions options (colored in purple).
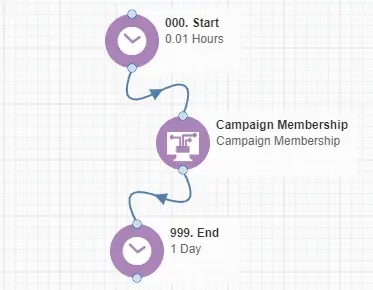
- Drag and drop the cloud action to the canvas area. Connect the corresponding elements to the dropped cloud action
- Double click the Campaign Membership step, you will see some options for this element.
- Rename the step if needed
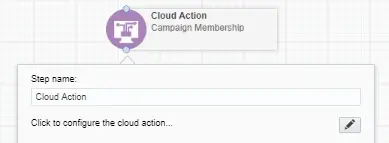
- Click the pencil icon to open the settings for this step.
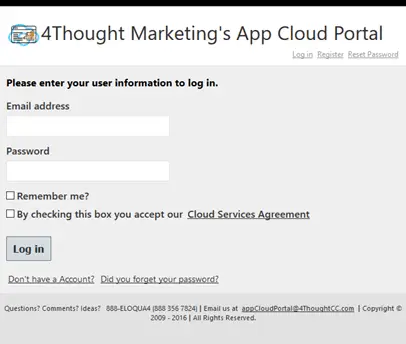
You will need a user to log in and configure this Cloud Action. If you don’t have one, you can create one. If you do, use your user to Log In in the page shown in the following screenshot:
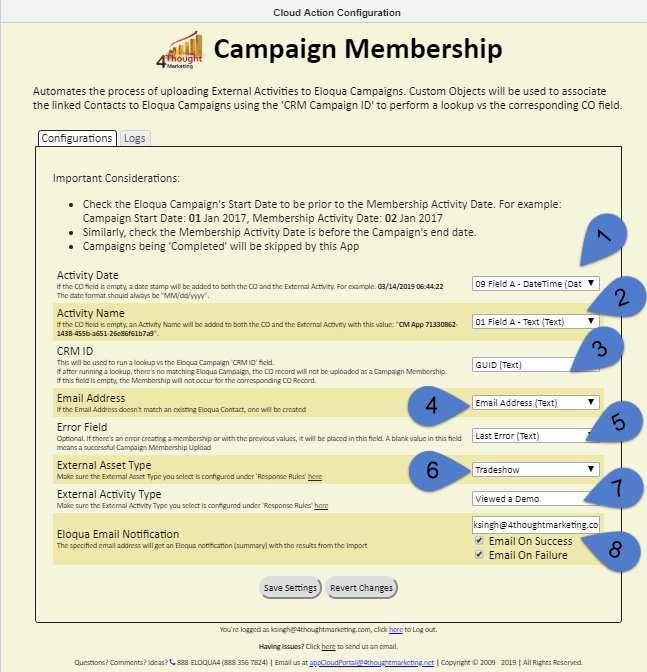
- For this cloud action, you can indicate the CO Fields to execute the Campaign Membership App.
- For this cloud action, you can indicate the CO Fields to execute the Campaign Membership App.
- Activity Date: Select the date field from the CO to add the date of the activity for the campaign response or else app will stamp the current date. Make sure the Activity Date is On or After the Campaign activated date.
- Activity Name: Select the CO field where the app will find the Activity name, if the field is empty add the default value will be added.
- CRM ID: Select the CO field where the CRM ID will be stored on the CO record. This will be used to run a lookup vs the Eloqua Campaign ‘CRM ID’ field. If after running a lookup, there’s no matching Eloqua Campaign, the CO record will not be uploaded as a Campaign Membership. If this field is empty, the Membership will not occur for the corresponding CO Record.
- Email Address: Select the CO field for the Email address, If the Email Address doesn’t match an existing Eloqua Contact, one will be created.
- Error Field: Select the CO field to capture the error, this field is optional. If there’s an error creating a membership or with the previous values, it will be placed in this field. A blank value in this field means a successful Campaign Membership Upload.
- External Asset Type: This CO field will contain the External Asset Type. Make sure that asset type you select is configured under Response Rules.
- External Activity Type: This CO field will contain the External Activity Type. Make sure that activity type you select is configured under Response Rules.
- Eloqua Email Notification: Configure this step by adding the email address to get the Email Notification on success or failure.
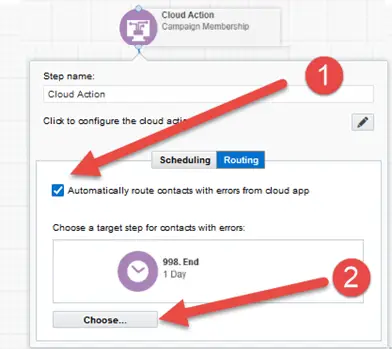
- Recommended: Create an element in the program in case an error happens, in this example it’s a Wait Step. Check the box to “Automatically route contacts with errors from cloud app”.
,sSelect the step where you want the contacts to be routed.
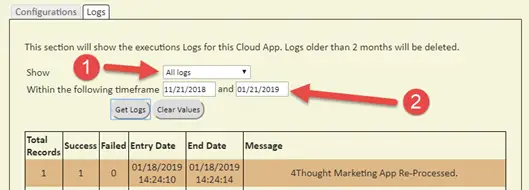
- Logs Tab: This section shows the execution logs for the respective cloud app
- Show: Here you can select what type of log you want to see, it gives you an option to select “All logs”, “Successful logs only”, “Failed logs only”
- Within the following timeframe: This field allows you to select the timeframe to view the execution logs.
Note: You can view up to 2 months older logs only
- How to Configure the CO to Feed New Contact to Program
- CO Program can only be feed by the records which are already present in the CO, so you need use Custom Object Services of the CO (which you have selected in the Program, with all the fields mentioned in step 2.7) to feed the records into the program
- Add the Listener Step and add it to the starting of the Program and Click on save
- Open the CO which you have selected in the Program, select the Custom Object Services as shown in below snapshot
- Click on “Custom Object Services” step to configure
- Select the “New Data” this service will feed every new record added in the CO and then select “Edit Service Actions”
- Click on “Add Processing Steps” and select the “Add to Step in Program” and then click on “Add” as shown in below snapshot
- Select the Program Listener Step and click on “Save and Close” as shown in below snapshot
- How to upload Records/list to the CO
- Select the Custom Object (which you have selected in the Program, with all the fields mentioned in step 2.7)
- Click on Custom Object option in the top right side and select Upload Custom Object Record as shown in below snapshot
- Name you upload as per your requirement and Click on Next
- First Click on Choose File and select the file that you want to upload after that Click on Upload and Preview Data as shown in below snapshot. Now Click on Next
- Map the source fields with CO fields exactly that you have selected in Cloud App Configuration Panel and then click on Next
- Check on Map data Cards checkbox, so that It will also create the Contact record if Contact is not in the contact table. Once selected Click on Next.
- Review the summary of upload, and click on Finish
- Now Close the section by clicking on the red cross at the top right of the box
- That’s it, CO services runs in every 15 min means after 15 min the records will feed to the Program.
License Information
You need a license to configure and execute this Cloud App. If you don’t have a license, an error message will appear on the configuration page.
If you don’t see CO Records being processed by the app, it may be because your license is missing or expired. To obtain a license, contact your account manager or contact us.
- Each Eloqua instance requires a separate cloud app license.
- Each cloud app license includes a reasonable usage limitation of 250k records processed daily and up to 5 app instantiations per Eloqua instance. Higher usage tiers are available at extra cost.
- For additional license details, please review the Cloud Services User License Agreement.